
Edit a work instruction or a folder
Editing your work instructions in Azumuta is remarkably easy, thanks to our intuitive interface! Here are the basics that you should know:
Change the name of a work instruction
- Navigate to the work instruction that you would like to rename.
- Click the ⋮ (three-dot) icon next to it.
- Click Edit work instruction.
- Type the new work instruction name in the Name field.
- Click Save.
Change the name of a folder
- Navigate to the folder that you would like to rename.
- Click the ⋮ (three-dot) icon next to it.
- Click Edit folder.
- Type the new folder name in the Name field.
- Click Save.
Delete a work instruction
- Navigate to the work instruction that you would like to delete.
- Click the ⋮ (three-dot) icon next to it.
- Click Delete work instruction.
- Type in the name of the work instruction.
- Click Delete permanently.
Delete a folder
- Navigate to the folder that you would like to delete.
- Click the ⋮ (three-dot) icon next to it.
- Click Delete folder.
- Type in the name of the folder.
- Click Delete permanently.
Copy and paste a work instruction
Use this procedure to copy one work instruction in the same workspace:
- Go to the work instruction that you want to copy.
- Click the ⋮ (three-dot) icon.
- Click Copy work instruction.
- Go to the destination folder.
- Click the ⋮ (three-dot) icon for the destination folder.
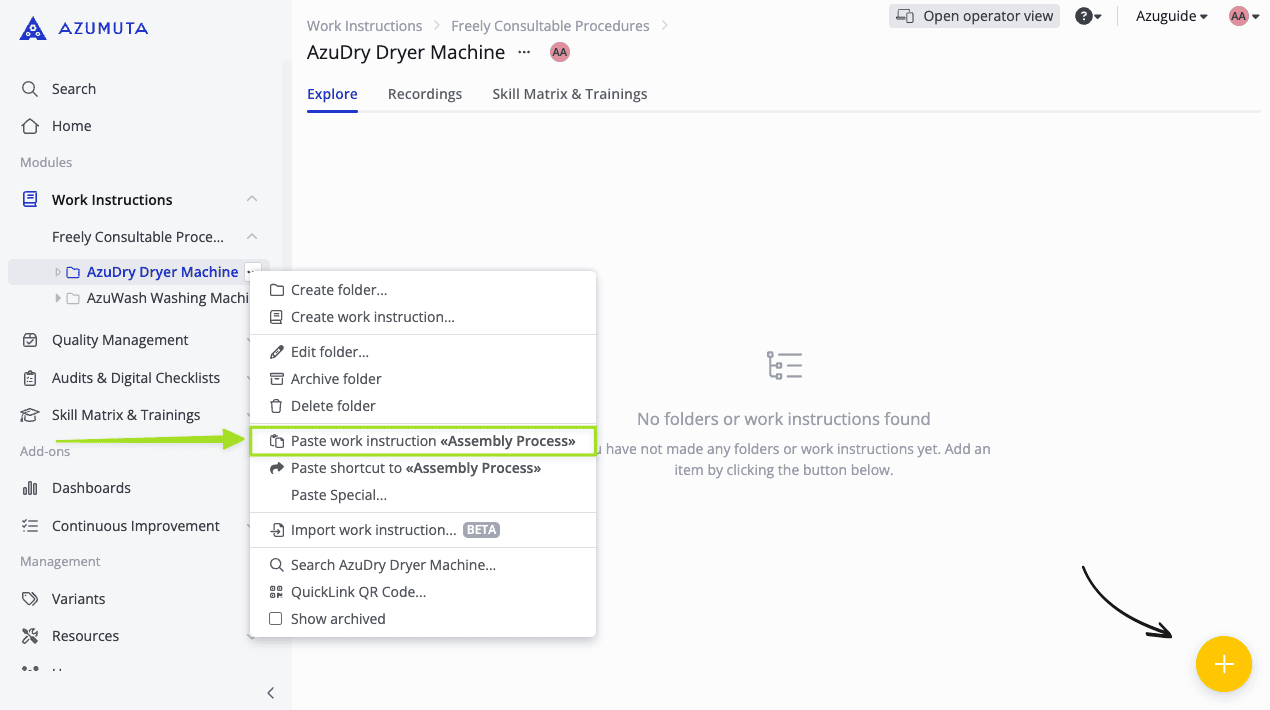
- To make an independent copy, click Paste.
- To select a copy type, click Paste Special.
- Select Paste as a deep copy or Paste as a shallow copy.
Select the copy type
- Deep copy: Azumuta creates an independent work instruction. A change to one work instruction does not change the other work instruction. Paste uses this copy type by default.
- Shallow copy: Azumuta creates a linked work instruction. A change to the shared instruction content is available in each linked location.
Use Content Sync when you must copy content to a different workspace.
Copy and paste a folder or zone
When you copy a folder or zone, Azumuta copies its complete subtree. The copy includes child folders, zones, article categories, and work instructions.
- Go to the folder or zone that you want to copy.
- Click the ⋮ (three-dot) icon.
- Click the copy command.
- Go to the destination folder or zone.
- Click the ⋮ (three-dot) icon for the destination.
- Click Paste to make a deep copy.
- Alternatively, click Paste Special to select a deep copy or a shallow copy.
Azumuta copies the subtree in the background. The new root item is read-only until the copy is complete. If the copy fails, Azumuta removes the incomplete copy.
A single copy can contain a maximum of 200 non-archived work instructions. If the subtree contains more work instructions, copy a smaller part of the tree.
You can copy a subtree only within one workspace. Use Content Sync to move managed content between workspaces.
Archiving a Work Instruction
What Is Archiving?
Do you have a work instruction that you no longer use, but you still want to keep just in case it’s ever needed again in the future? Then, archiving it is the solution!
Your archived work instruction will be hidden from your list of work instructions. However, it can be brought back anytime by unarchiving it. Here’s how it works:
Archive a work instruction
- Navigate to the work instruction that you would like to archive.
- Click the ⋮ (three-dot) icon next to it.
- Click Archive work instruction.
- If the work instruction has been archived, the screen will display the Could not find this node text.
Unarchive a work instruction
- Click Work Instructions on the homepage sidebar.
- Click the ⋮ (three-dot) icon next to Freely Consultable Procedures.”
- Make sure that the Show archived box is ticked.
- Click an empty space.
- Locate the work instruction that you would like to unarchive, and click the ⋮ (three-dot) icon next to it.
- Click Unarchive work instruction.
The steps above only apply to unarchiving a work instruction that was made under the Work Instructions module. But, what if the work instruction was made under another module? Check out the sections below.
Unarchive a work instruction that was made under the quality management module
- Click Quality Management on the homepage sidebar.
- Click Quality Procedures.
- Click the ⋮ (three-dot) icon next to it.
- Make sure that the Show archived box is ticked.
- Locate the work instruction that you would like to unarchive, and click the ⋮ (three-dot) icon next to it.
- Click Unarchive work instruction.
Unarchive an audit that was made under the audits & digital checklists module
- Click Audits & Digital Checklists on the homepage sidebar.
- Click Audit Procedures.
- Click the ⋮ (three-dot) icon next to it.
- Make sure that the Show archived box is ticked.
- Locate the audit that you would like to unarchive and click the ⋮ (three-dot) icon next to it.
- Click Unarchive audit.
Unarchive a work instruction that was made under the skill matrix & trainings module
- Click Skill Matrix & Trainings on the homepage sidebar.
- Click Training Procedures.
- Click the ⋮ (three-dot) icon next to it.
- Make sure that the Show archived box is ticked.
- Locate the work instruction that you would like to unarchive, and click the ⋮ (three-dot) icon next to it.
- Click Unarchive work instruction.
Archive a folder
- Navigate to the folder that you would like to archive.
- Click the ⋮ (three-dot) icon next to it.
- Click Archive folder.
Unarchive a folder
- Click Work Instructions on the homepage sidebar.
- Click Freely Consultable Procedures.
- Click the ⋮ (three-dot) icon next to Freely Consultable Procedures.
- Make sure that the Show archived box is ticked.
- Click an empty space.
- Locate the folder that you would like to unarchive and click the ⋮ (three-dot) icon next to it.
- Click Unarchive work instruction.
The steps above only apply to unarchiving a folder that was made under the Work Instructions module. But, what if the folder was made under another module? Check out the sections below.
Unarchive an article category
- Click Quality Management on the homepage sidebar.
- Click Quality Procedures.
- Click the ⋮ (three-dot) icon next to it.
- Make sure that the Show archived box is ticked.
- Locate the article category that you would like to unarchive and click it.
- Then, click the ⋮ (three-dot) icon next to it.
- Click Unarchive article category.
Unarchive a folder that was made under the audits & digital checklists module
- Click Audits & Digital Checklists on the homepage sidebar.
- Click Audit Procedures.
- Click the ⋮ (three-dot) icon next to it.
- Make sure that the Show archived box is ticked.
- Locate the folder that you would like to unarchive and click it.
- Then, click the ⋮ (three-dot) icon next to it.
- Click Unarchive folder.
Unarchive a folder that was made under the skill matrix & trainings module
- Click Skill Matrix & Trainings on the homepage sidebar.
- Click Training Procedures.
- Click the ⋮ (three-dot) icon next to it.
- Make sure that the Show archived box is ticked.
- Locate the folder that you would like to unarchive, and click it.
- Then, click the ⋮ (three-dot) icon next to it.
- Click Unarchive folder.
Assign a tag to a work instruction
A tag can be used to help identify work instructions. Here’s how to assign a tag to a work instruction:
- Navigate to the work instruction where you would like to assign a tag
- Click the ⋮ (three-dot) icon next to it.
- Click Edit work instruction.
- Select the desired tag or make a new tag.
- Click Save.
Note: A work instruction can have more than one tag.
Assigning a tag to a work instruction is always a good idea, as a tag can be used as a tool to identify your work instructions.
Additionally, for audits (work instructions that were made under the Audits & Digital Checklists module) and work instructions that were made under the Skill Matrix & Training module, a tag has an additional function: a tag can be used to filter audits and work instructions on the planning tool.
The images from the planning tool below (the first is from the Audits & Digital Checklists module, while the second is from the Skill Matrix & Training module) show where you can access this feature.
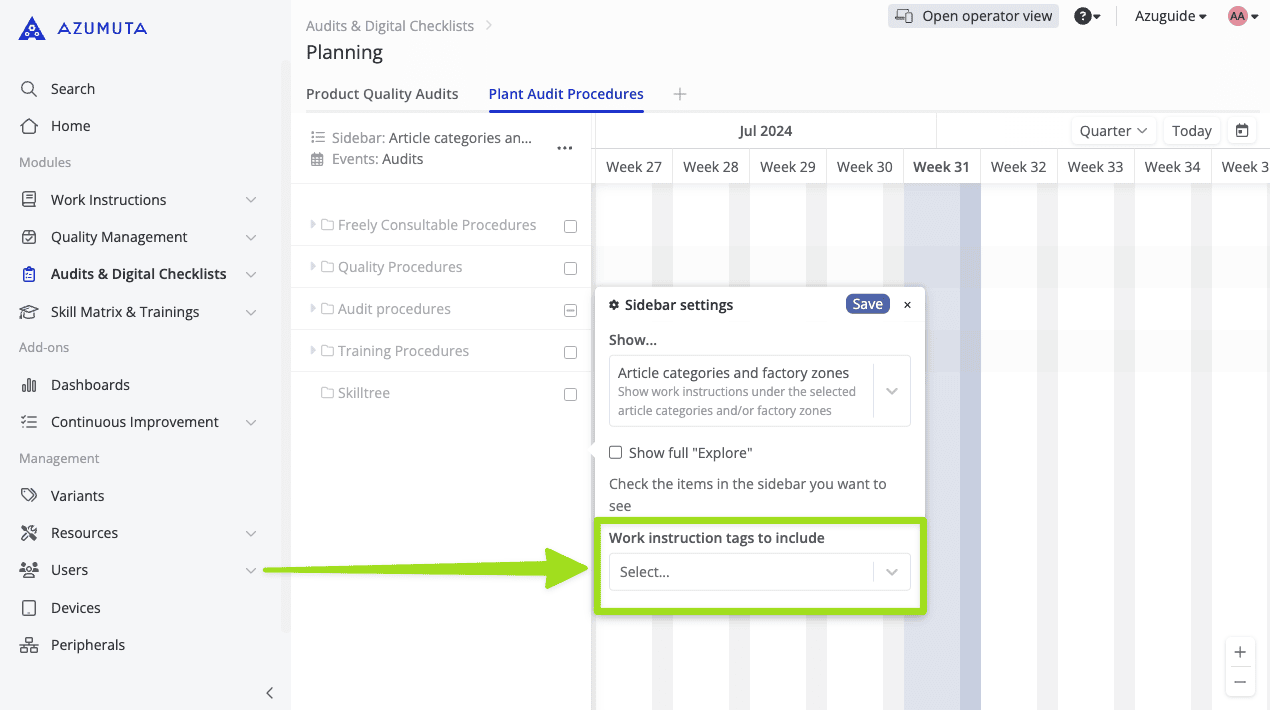
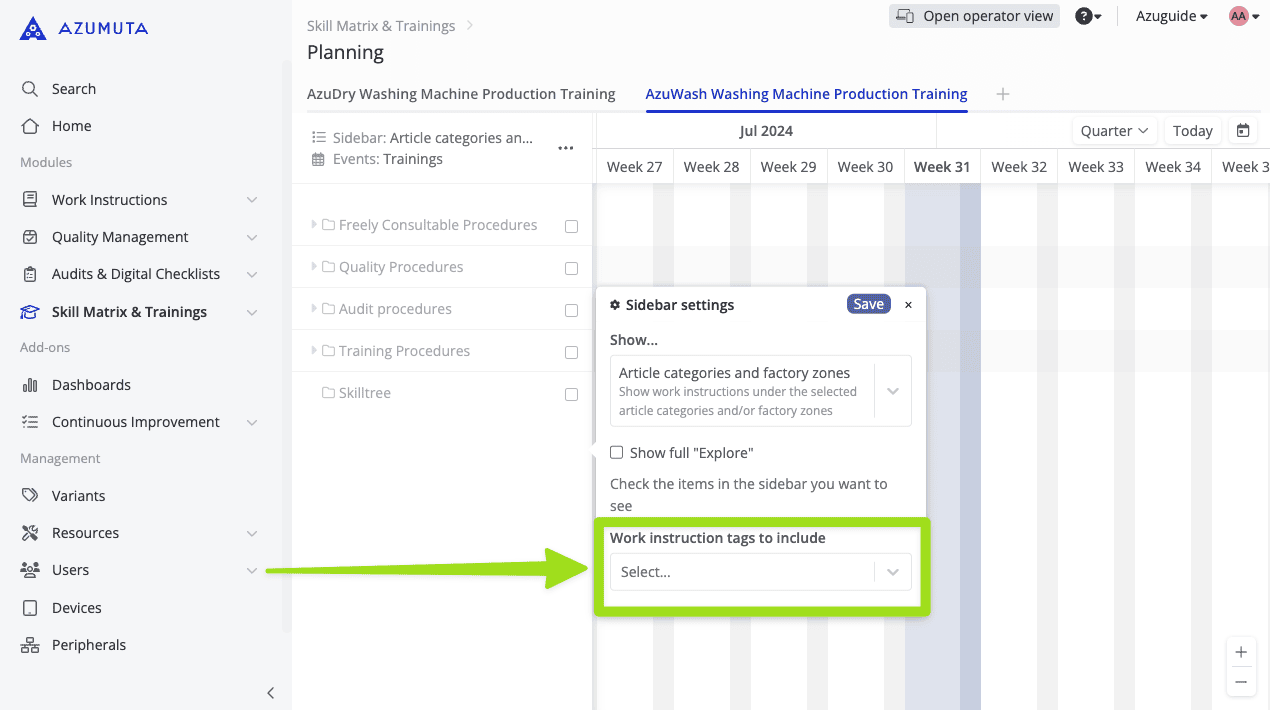
If you have many audits and/or work instructions on your workspace, assigning a tag for each of them can be really useful, as it’ll help you to locate any particular audit/work instruction in an instant.
Assign a tag to a folder
- Navigate to the folder where you would like to assign a tag.
- Click the ⋮ (three-dot) icon next to it.
- Click Edit folder.
- Select the desired tag or make a new tag.
- Click Save.
Note: A folder can have more than one tag.
Add a thumbnail to a work instruction
You can add a thumbnail to a work instruction. A thumbnail can help your operators to recognize your work instructions. Here’s how to add a thumbnail to a work instruction:
- Navigate to the work instructions to which you would like to add a thumbnail.
- Click the ⋮ (three-dot) icon next to it.
- Click Edit work instruction.
- Click Choose file next to the Thumbnail section.
- Upload the image file.
- Click Save.
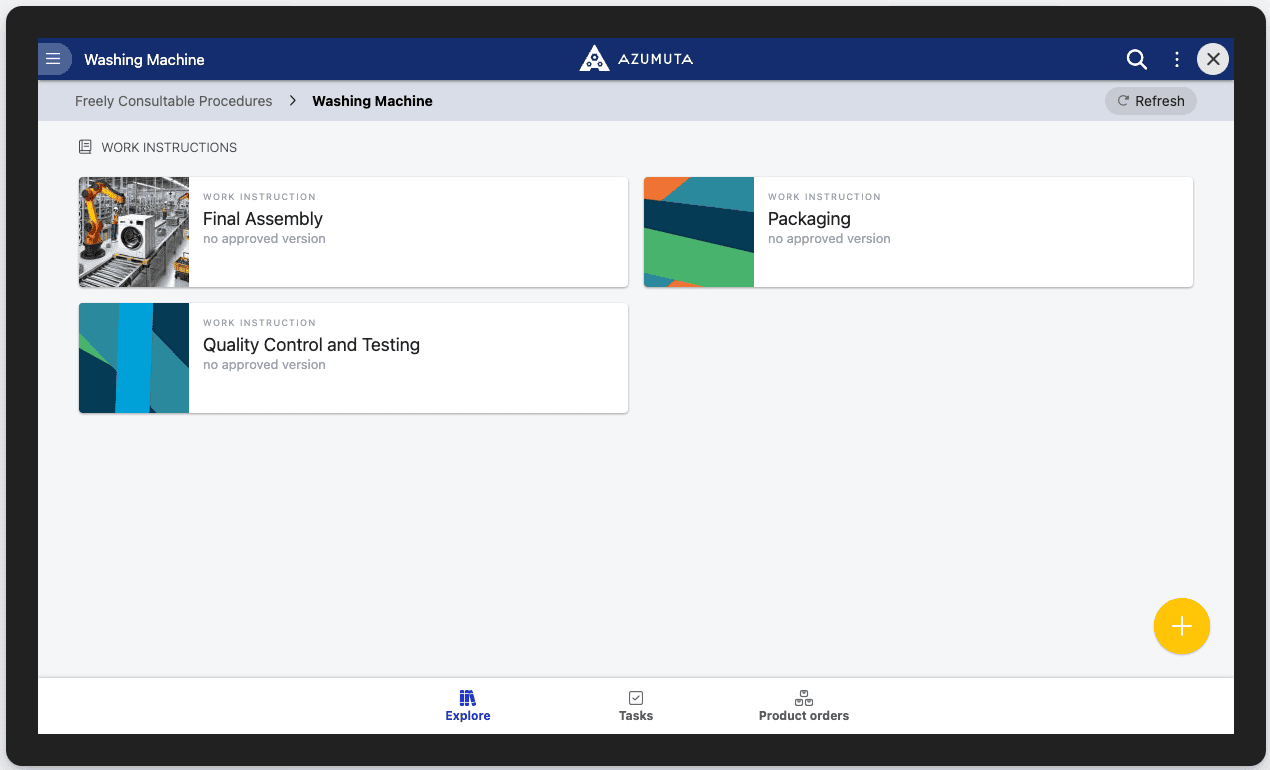
From the operator interface, the “Final Assembly” work instruction has a custom thumbnail, while the other two have a generic thumbnail.
Add a thumbnail to a folder
- Navigate to the folder to which you would like to add a thumbnail.
- Click the ⋮ (three-dot) icon next to it.
- Click Edit folder.
- Click Choose file next to the Thumbnail section.
- Upload the image file.
- Click Save.
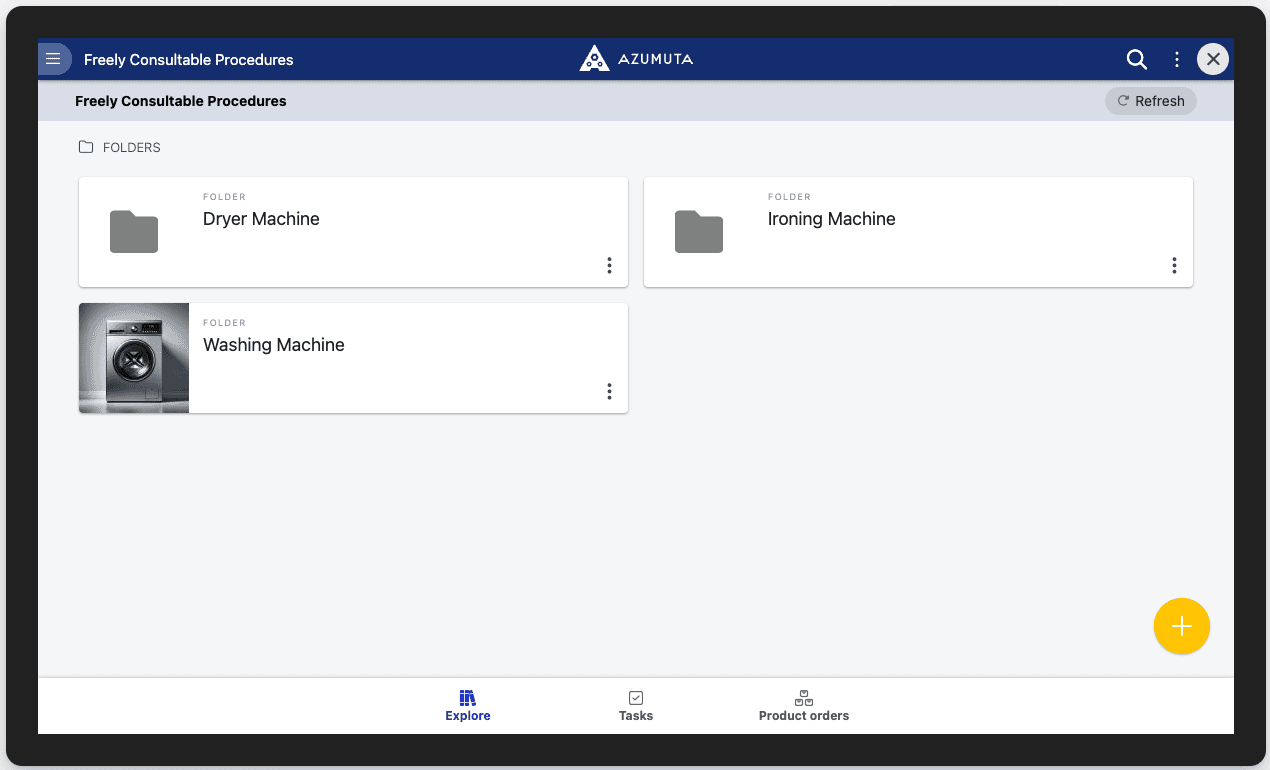
From the operator interface, the “Washing Machine” folder has a custom thumbnail, while the other two have no thumbnail.
- Change the name of a work instruction
- Change the name of a folder
- Delete a work instruction
- Delete a folder
- Copy and paste a work instruction
- Copy and paste a folder or zone
- Archiving a Work Instruction
- Archive a folder
- Unarchive a folder
- Assign a tag to a work instruction
- Assign a tag to a folder
- Add a thumbnail to a work instruction
- Add a thumbnail to a folder