
Manage user accounts on a workspace
As an admin, you can edit, archive, restore, or delete user accounts. You can also reset passwords, import users, and log in as another user.
To reach any user action: go to Management → Users → Overview, then click the ⋮ (three-dot) icon next to the user.
Edit a user account
- From the ⋮ menu, click Edit user.
- Make your changes, then click Save. To discard them, click Cancel.
The editor lets you change:
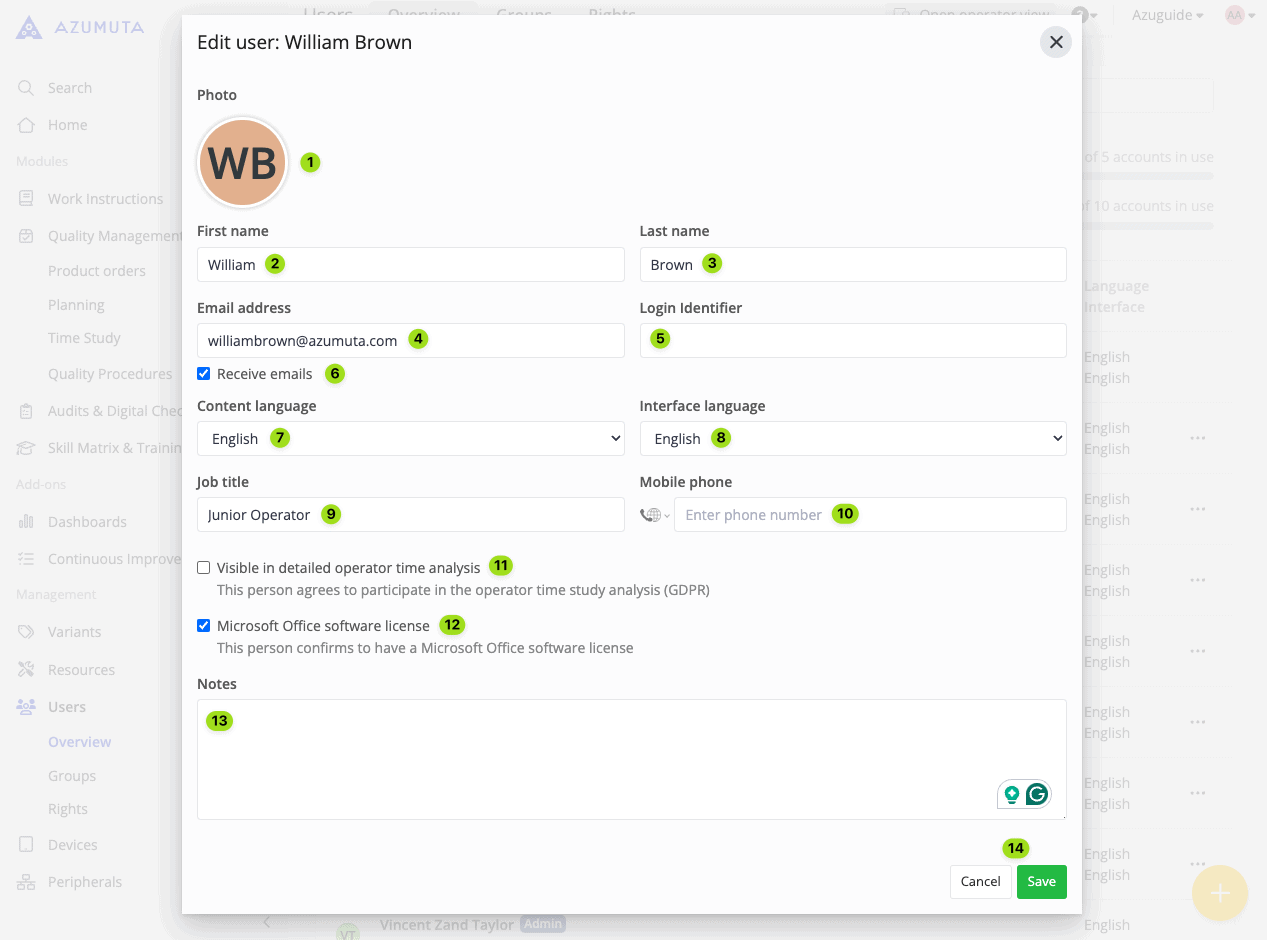
- Profile photo
- First and last name
- Login identifier
- Whether the user receives emails from Azumuta. Keep this on, since many features rely on email.
- Content language, used for Azumuta-made content such as work instructions
- Interface language
- Job title
- Mobile phone number
- Whether to track the user's time with the Time Study feature
- Whether the user has a Microsoft Office license. If on, the user can edit Microsoft Word files in Azumuta.
- Additional notes
Polish and Swedish are available as interface languages. After you change the interface language, Azumuta uses the new language the next time that the user loads the interface.
Archive a user account
Archive a user when the user must not have access but you must keep the user's history.
- From the ⋮ menu, click Archive user.
- Click Archive.
The archived user cannot access the workspace. Azumuta removes the user from selection fields. The user stays visible in the user list and in historical records. The user's signatures and audit trail stay available.
You cannot archive your own account. Your role must have the delete users right.
Restore an archived user account
- Show archived users in Management > Users > Overview.
- From the ⋮ menu, click Unarchive user.
- Click Unarchive.
The user can access the workspace and appears in selection fields again.
Delete a user account
From the ⋮ menu, click Delete user, then confirm with Delete.
Reset a password via email
From the ⋮ menu, click Reset password. Azumuta emails the user a link to reset their password.
Set a password manually
- From the ⋮ menu, click Set the password of the user manually.
- Type the new password. Meet the requirements listed below the field.
- Re-type the password.
- Click Save, then click OK.
Log in as another user
- From the ⋮ menu, click Generate one-time QR code to login user.
- Scan the QR code with your device. You are logged in to that user's profile.
Import users in bulk
Use bulk import when you need to create many user accounts at once from a spreadsheet.
To start: go to Management → Users → Overview, then click Create users in bulk.
The wizard has four steps:
- Upload file - upload a
.csvor.xlsxfile with one row per user. - Map columns - match your spreadsheet headers to Azumuta fields. Required columns are First name and Name (last name). You can also map:
- Login identifier
- Content language
- Interface language
- Job title
- Mobile phone
- Microsoft Office software license
- Visible in detailed operator time analysis
- Notes
- Any user-scoped custom properties configured on your workspace (mandatory properties must appear as columns)
- Inspect users - review the parsed rows, select at least one user group for the new users, and set default content and interface languages. These apply to every row unless a column overrides them. Then confirm to create the accounts.
- Result - see how many users were created and which rows could not be imported.
After import, new users receive enrollment instructions by email when an email address is provided.
For adding users one at a time instead, see how to add a user account.